Quantcast
Channel: Blog | Limilabs
Viewing all 120 articles
Browse latest View live

Process BinHex email attachments

$
0
0

One of the recent Mail.dll email component updates brings the ability to process BinHex encoded email attachments.

BinHex is short for “binary-to-hexadecimal”. It is a binary to 7bit ASCII text encoding, that was used on the Mac OS for sending binary files through email. It is similar to Uuencode and Base64 encodings (both supported by Mail.dll), but it combines both “forks” (data and resources) of the Mac file.

As with all other data-to-ASCII encodings, BinHex files usually take more space than the original files, however as BinHex includes very simple run-length compression, encoded files may be smaller under some circumstances.

Below you can see such file inside a MIME entity:

Content-type: application/mac-binhex40; name="binhex.test.sit"
Content-disposition: attachment; filename="binhex.test.sit"

(This file must be converted with BinHex 4.0)

:$f*TEQKPH#jdCA0d,R0TG!"6594%8dP8)3#3"!&m!*!%EMa6593K!!%!!!&mFNa
[...]
Z"`#3!fKi!!!:

Mail.dll is going to extract data fork from such entity and put it in the IMail.Attachments collection, just like it was attached using standard MIME-way.

byte[] eml = ...;

IMail mail = new MailBuilder().CreateFromEml(eml);
Assert.AreEqual(1, mail.Attachments.Count);
MimeData att = (MimeData) mail.Attachments[0];

byte[] data = att.Data; // data fork

You can control, if BinHex attachments should be processed using MailBuilder.ProcessBinHexAutomatically property:

byte[] eml = ...;

MailBuilder builder = new MailBuilder();
builder.ProcessBinHexAutomatically = false;
IMail mail = builder.CreateFromEml(eml);
Assert.AreEqual(1, mail.Attachments.Count);
MimeBinHex binHex = (MimeBinHex) mail.Attachments[0];

byte[] data = binHex.BinHex.Data;
byte[] resource = binHex.BinHex.Resource;

string name = binHex.BinHex.Name;

As you can see, data fork is not extracted automatically and you can use MimeBinHex instance to access both data and resource forks and other information stored inside the BinHex encoded attachment.


OAuth 2.0 with Gmail over IMAP for service account

$
0
0

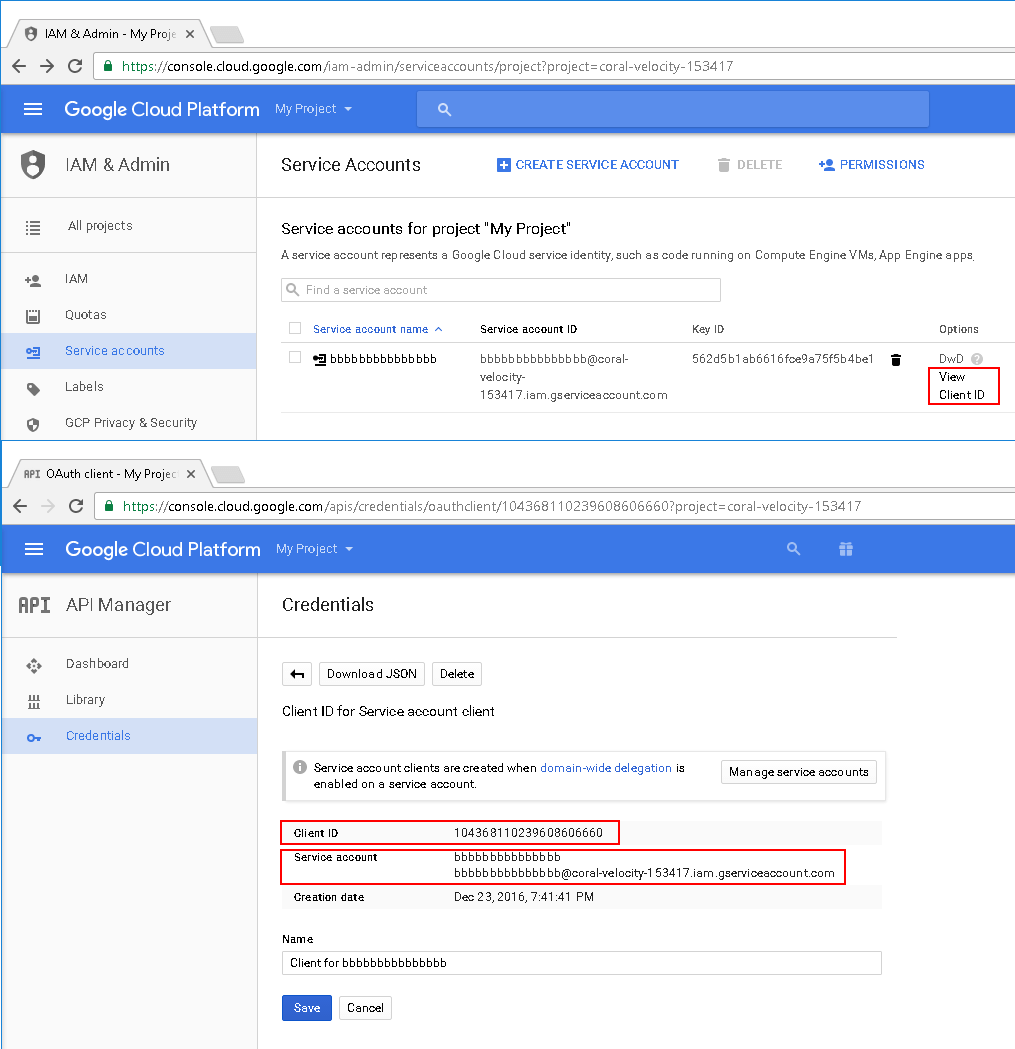
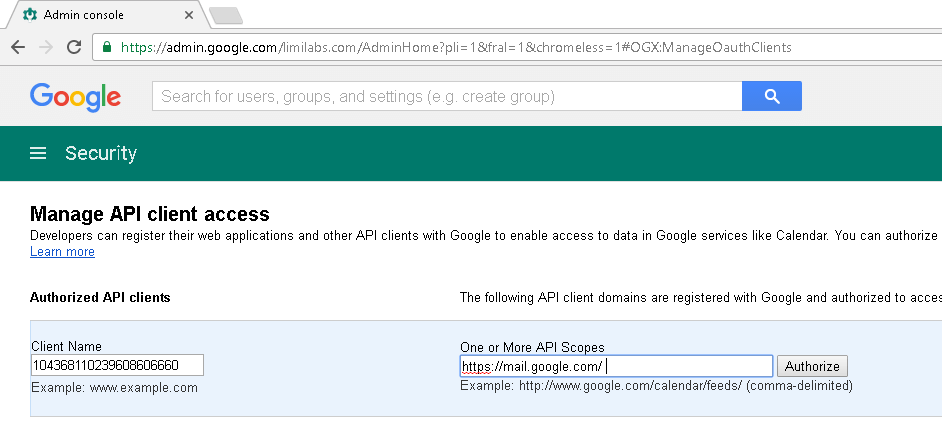
In this article I’ll show how to access Gmail account of any domain user, using OAuth 2.0, .NET IMAP component and service accounts. The basic idea is that domain administrator can use this method to access user email without knowing user’s password.

This scenario is very similar to 2-legged OAuth, which uses OAuth 1.0a. Although it still works, it has been deprecated by Google and OAuth 2.0 service accounts were introduced.

The following describes how to use XOAUTH2 and OAuth 2.0 to achieve the equivalent of 2-legged OAuth.

Google APIs console

First you need to visit the Google API Console and create a service account:

console_0

console_1

console_2

console_3

Download and save this private key, you’ll need that later.

console_4

Make a note of the Client ID (Your-ID.apps.googleusercontent.com), Email address (Your-ID@developer.gserviceaccount.com) and makes sure you have saved the private key (XYZ-privatekey.p12) somewhere – you will need these later.

Google Apps Dashboard

Next step is to authorize access for newly created service account.

Visit your domain administration panel:

https://www.google.com/a/cpanel/yourdomain.com/ManageOauthClients

Then click “Advanced tools”, “Authentication” and “Manage third party OAuth Client access”.

On this screen you can authorize service account to access email scope:

cpanel_1

Use previously remembered Client ID and “https://mail.google.com/”, which is IMAP/SMTP API scope:

Client Name: Your-ID.apps.googleusercontent.com
One or More API Scopes: https://mail.google.com/

Google.Apis

Use Nuget to download “Google.Apis.Auth.Mvc” and “Google.Apis.Auth” packages.

Access IMAP/SMTP server

// C#

using System.Security.Cryptography.X509Certificates;
using System;
using System.Threading;
using Limilabs.Client.IMAP;
using Limilabs.Test.Constants;
using Google.Apis.Auth.OAuth2;
using Limilabs.Client.Authentication.Google;


const string serviceAccountEmail = "Your-ID@developer.gserviceaccount.com";
const string serviceAccountCertPath = @"c:\XYZ-privatekey.p12";
const string serviceAccountCertPassword = "notasecret";
const string userEmail = "user@your-domain.com";

X509Certificate2 certificate = new X509Certificate2(
    serviceAccountCertPath, 
    serviceAccountCertPassword, 
    X509KeyStorageFlags.Exportable);

ServiceAccountCredential credential = new ServiceAccountCredential(
    new ServiceAccountCredential.Initializer(serviceAccountEmail)
    {
        Scopes = new[] { GoogleScope.ImapAndSmtp.Name },
        User = userEmail
    }.FromCertificate(certificate));

bool success = credential.RequestAccessTokenAsync(CancellationToken.None).Result;
Assert.IsTrue(success);

using (Imap imap = new Imap())
{
    imap.ConnectSSL("imap.gmail.com");
    imap.LoginOAUTH2(userEmail, credential.Token.AccessToken);

    imap.SelectInbox();

    foreach (long uid in uids)
    {
        var eml = client.GetMessageByUID(uid);
        IMail email = new MailBuilder().CreateFromEml(eml);
        Console.WriteLine(email.Subject);
    }

    imap.Close();
}
' VB.NET

Imports System.Security.Cryptography.X509Certificates
Imports System.Threading
Imports Limilabs.Client.IMAP
Imports Limilabs.Test.Constants
Imports Google.Apis.Auth.OAuth2
Imports Limilabs.Client.Authentication.Google


Const  serviceAccountEmail As String = "Your-ID@developer.gserviceaccount.com"
Const  serviceAccountCertPath As String = "c:\XYZ-privatekey.p12"
Const  serviceAccountCertPassword As String = "notasecret"
Const  userEmail As String = "user@your-domain.com"

Dim certificate As New X509Certificate2(serviceAccountCertPath, serviceAccountCertPassword, X509KeyStorageFlags.Exportable)

Dim credential As New ServiceAccountCredential(New ServiceAccountCredential.Initializer(serviceAccountEmail) With { _
	Key .Scopes = New () {GoogleScope.ImapAndSmtp.Name}, _
	Key .User = userEmail _
}.FromCertificate(certificate))

Dim success As Boolean = credential.RequestAccessTokenAsync(CancellationToken.None).Result
Assert.IsTrue(success)

Using imap As New Imap()
	imap.ConnectSSL("imap.gmail.com")
	imap.LoginOAUTH2(userEmail, credential.Token.AccessToken)

	imap.SelectInbox()

	For Each uid As Long In uids
		Dim eml = client.GetMessageByUID(uid)
		Dim email As IMail = New MailBuilder().CreateFromEml(eml)
		Console.WriteLine(email.Subject)
	Next

	imap.Close()
End Using

Processing applesingle and appledouble email attachments

$
0
0

Mail.dll now supports applesingle and appledouble email attachments.

AppleSingle and AppleDouble are file formats developed to store Mac OS “dual-forked” files (data fork and resource fork)

AppleSingle combines both file forks and the related Finder meta-file information into a single file MIME entity, usually with application/applesingle content-type email header. Applesingle files are parsed by Mail.dll and data fork is extracted as a standard email attachment available through IMail.Attachments collection.

AppleDouble stores both forks as two separate files. Thus it uses multipart mime type – inside two MIME entities are stored: application/applefile, which contains resource fork only, and regular MIME attachment e.g. application/octet-stream content-type.

In both cases you simply use IMail.Attachments collection to access attachments.

byte[] eml = ...;

IMail mail = new MailBuilder().CreateFromEml(eml);
Assert.AreEqual(1, mail.Attachments.Count);
MimeData att = (MimeData) mail.Attachments[0];

byte[] data = att.Data; // data fork

You can control, if apple attachments should be processed using MailBuilder.ProcessAppleAutomatically property. When it is set to false applesingle files are not parsed and data fork is not extracted.

byte[] eml = ...;

MailBuilder builder = new MailBuilder();
builder.ProcessBinHexAutomatically = false;
IMail mail = builder.CreateFromEml(eml);

MimeAppleSingle appleSingle = (MimeAppleSingle) mail.Attachments[0];

Assert.AreEqual(ContentType.ApplicationAppleSingle, appleSingle.ContentType);

byte[] resource = appleSingle.AppleSingle.Resources;
string name = appleSingle.AppleSingle.RealName;

Using Limilabs’ Ftp.dll with zOS Mainframes

$
0
0

I purchased the Limilabs FTP product for FTP because I needed to send data to and from an IBM mainframe from my VB.NET program running in Windows. In particular I needed to be able to submit jobs, and receive the job output. These notes show how it’s done.

Introduction

FTP to/from IBM computers is pretty much like any other FTP except for two things.
1. IBM Mainframe and Midrange computers mostly use EBCDIC encoding rather than ASCII. With the FTP defaults your data can be garbled and useless when it arrives at the other end.
2. The SITE command is used to submit jobs to the mainframe, and get the results back.

Getting Started

I created a class called “JazzFTP” to wrap the Limilabs’ code. This was going to contain the functions that I wanted for my project, and so I started by defining the common elements that all methods would use. In my situation every FTP would be authenticated, and would be exchanging text data (not binary) with the remote computer.

Here is the initial class definition:

Imports Limilabs.FTP.Client

Public Class JazzFTP
    '   This class wraps the FTP library from Limilabs (http://www.limilabs.com/ftp)
    '   All methods
    '   1   Connect and logon using information from MySettings:  Sub LoginFTP
    '   2   Perform their action based on their parameters
    '   3   Close the connection
    Dim ftp As New Ftp()
    Dim response As FtpResponse
    Private Sub LoginFTP()
        ftp.Connect(My.Settings.SubmitIP)
        ftp.Login(My.Settings.Userid, My.Settings.Password)
    End Sub
    '   My functions will be written here
End Class

Basic FTP

Here is my first method, a basic function to upload a text file: –

    Function Upload(DestinationFile As String, Uploadfile As String) As String 
        LoginFTP()
        ftp.TransfersDataType = FtpDataType.Ascii
        response = ftp.Upload(DestinationFile, Uploadfile)
        ftp.Close()
        Return response.message
    End Function

FTP’s default is Binary, which is correct if you are transmitting a .JPG or other binary object, and it probably doesn’t matter if you are transmitting text to/from another Windows computer or a Unix computer. However if you are transmitting to/from an IBM mainframe or midrange computer it probably needs EBCDIC rather than ASCII characters. You must tell it that the file is Ascii text, not binary, otherwise it won’t be converted and it will be gibberish when you examine it on the mainframe.

Although this code above works, it is very fragile: the FTP server has to be up and running, you have to get the connection details exactly right, the source and destination files must exist, and so on. Since I couldn’t guarantee all of these details, I enclosed the code in Try/Catch to deal with any errors. For the time being I’ve simply used MsgBox to display the error message.

    Function Upload(DestinationFile As String, Uploadfile As String) As String
        Try
            LoginFTP()
            ftp.TransfersDataType = FtpDataType.Ascii
            response = ftp.Upload(DestinationFile, Uploadfile)
            ftp.Close()
            Return response.EndLine
        Catch ex As Exception
            MsgBox(ex.Message)
            Return ex.Message
        End Try
    End Function

Download, which is not illustrated, is similar except that you’d use ftp.Download. Again, you specify:

            ftp.TransfersDataType = FtpDataType.Ascii

Submitting Jobs and Receiving Job Output

Submitting a job is essentially an upload with a twist. Instead of uploading the file containing the job to a named file on the mainframe, you upload it to the JES (Job Entry System) input queue. Here is the basic code:

            response = ftp.Site("FILETYPE=JES")
            ftp.TransfersDataType = FtpDataType.Ascii
            response = ftp.Upload("JES", JCLFile)

The first line uses “ftp.Site”. Site means that this is a site-specific command, something that the FTP system at the other end will presumably know about. For an IBM mainframe “FILETYPE=JES” means that the data is going to and from JES.

The third line uploads the file in which we have prepared our job: in this case JCLFile is a file containing something like this: –

//IBMUSERH JOB  ,CLASS=A,MSGCLASS=H,NOTIFY=&SYSUID,COND=(8,LT) 
//*** COPY SOURCE INTO SOURCE LIBRARY
//COPY EXEC PGM=IEBGENER
//SYSPRINT DD SYSOUT=*
//SYSIN DD DUMMY
//SYSUT2 DD DSN=IBMUSER.MANAJAZZ.SRCLIB(CRDTA1),DISP=SHR
//SYSUT1 DD *

Like any upload the FTP client syntax requires a destination file name, but because of the preceding FILETYPE=JES this will be ignored. I have written “JES” purely for documentation.

This will submit the job and it will run, appearing in the output like this:

tasks

Of course we can view the job output on the mainframe, but we may want to return it to Windows. We do this by downloading the file by naming the JobID – JOB00594 in this case – and again using the Site command. The essential code is: –

        response = ftp.Site("FILETYPE=JES")
        ftp.TransfersDataType = FtpDataType.Ascii
        ftp.Download(Jobname, LocalPath)

But how do we get the Jobname? JES returns a message with this information when the job is submitted. We need to add code to the Job Submission logic to extract this from the message. In function JobSub

       response = ftp.Upload("JES", JCLFile)

upload the job and (if all goes well) returns a message like
“It is known to JES as JOB00594″
This code extracts JOB00594″ and puts it into variable JobName

       Dim TestString As String = "It is known to JES as"
       If Mid(response.Message, 1, Len(TestString)) = TestString Then  'Should be true
           Jobname = Trim(Mid(response.Message, Len(TestString) + 1))
       End If

Now, since it is logical that if we submit a job we’ll want to get it back, I coded this in the JobSub function: –

    Function JobSub(JCLFile As String, ByRef Jobname As String) As FtpResponse
        '   JCLFile is path to a .JCL file (format .txt) containing the job to be submitted
        '   If successful submission, the job name is returned in JobName
        Dim Tstring As String = ""
        Try
            Jobname = "Unknown"
            LoginFTP()
            response = ftp.Site("FILETYPE=JES")
            ftp.TransfersDataType = FtpDataType.Ascii
            response = ftp.Upload("JES", JCLFile)
            Dim TestString As String = "It is known to JES as"
            If Mid(response.Message, 1, Len(TestString)) = TestString Then  'Should be true
                Jobname = Trim(Mid(response.Message, Len(TestString) + 1))
            End If
            JobGet(Jobname, False)
            ftp.Close()
        Catch ex As Exception
            MsgBox(ex.Message, MsgBoxStyle.OkOnly, "Jazz FTP")
            Return response
        End Try
        Return response
    End Function

and I coded JobGet to accept these parameters: –

    Function JobGet(Jobname As String, Optional Login As Boolean = True) As FtpResponse
        '   Get job output, save as Jobname.txt in Jazz Program Library.  
        If Login Then
            LoginFTP()
        End If
        response = ftp.Site("FILETYPE=JES")
        ftp.TransfersDataType = FtpDataType.Ascii
        Dim LocalPath As String = My.Settings.UserCommonPath & "\" & My.Settings.Programs & "\" & Jobname & ".txt"
        Jazzworkbench.ShowBtnResults(Jobname, Jazzworkbench.ResultsStatus.Pending)
        ftp.Download(Jobname, LocalPath)
        ftp.DeleteFile(Jobname)
        Jazzworkbench.ShowBtnResults(Jobname, Jazzworkbench.ResultsStatus.JobReturned)
        ftp.Close()
        Return response
    End Function

Once the job output has been downloaded I didn’t want to leave it cluttering up my Held Job Output Queue, so after the Download

        ftp.DeleteFile(Jobname)

gets rid of it.

This all works for my test jobs (which are very quick) and provided that mainframe FTP server is available.

If you want to know any more about my project to revolutionize mainframe programming, then have a look at www.jazzsoftware.co.nz

Best wishes with your programming,
Robert Barnes.

Joining message/partial emails

$
0
0

With Mail.dll you can join a message split across multiple message/partial emails.

“Message/partial” emails allow large objects to be delivered as several mail messages and automatically joined by the receiving client. This mechanism can be used when intermediate transport agents, such as SMTP servers, are limiting the size of individual mails that can be sent. Content-Type “message/partial” indicates that the body contains a fragment of a larger email.

// C#

IMail part1 = ...
IMail part2 = ...

PartialMailJoiner joiner = new PartialMailJoiner();
joiner.Add(part1);
joiner.Add(part2);

IMail email = joiner.Join();
var attachments = email.Attachments;
' VB.NET

Dim part1 As IMail = "..."
Dim part2 As IMail = "..."

Dim joiner As New PartialMailJoiner()
joiner.Add(part1)
joiner.Add(part2)

Dim email As IMail = joiner.Join()
Dim attachments = email.Attachments

PartialMailJoiner.Add method checks if all parts of message/partial email are present and you can use PartialMailJoiner.Join method:

// C#

IMail part1 = ...
IMail part2 = ...

List<IMail> parts = new List<IMail>{part1, part2};

PartialMailJoiner joiner = new PartialMailJoiner();

foreach (IMail part in parts)
{
    if (part.IsPartial)
    {
        bool allPartsPresent = joiner.Add(part);

        if (allPartsPresent)
        {
            IMail email = joiner.Join();
            var attachments = email.Attachments;
        }
    }
}

' VB.NET

Dim part1 As IMail = ...
Dim part2 As IMail = ...

Dim parts As New List(Of IMail)() From { _
	part1, _
	part2 _
}

Dim joiner As New PartialMailJoiner()

For Each part As IMail In parts
    If part.IsPartial Then
        Dim allPartsPresent As Boolean = joiner.Add(part)

	If allPartsPresent Then
            Dim email As IMail = joiner.Join()
	    Dim attachments = email.Attachments
        End If
    End If
Next

Joining fragmented message is a bit tricky. Messages filtered using Content-Type’s id property and then sorted by Content-Type’s number property. Note that part numbering begins with 1, not 0.

The headers of the encapsulated message must be merged with the headers of the enclosing entities. Following rules must be used:

  • All of the header fields from the initial enclosing message, except those that start with “Content-” and the specific header fields” “Subject”, “Message-ID”, “Encrypted”, and “MIME-Version”, must be copied, in order, to the new message.
  • The header fields in the enclosed message which start with “Content-“, plus the “Subject”, “Message-ID”, “Encrypted”, and “MIME-Version” fields, must be appended, in order, to the header fields of the new message. all others will be ignored and dropped.
  • All of the header fields from the second and any subsequent enclosing messages are ignored.

Yahoo SMTP 8 BITMIME bug

$
0
0

It’s sometimes hard to believe, that even the biggest make such mistakes.

Here’s the capability (EHLO) response from Yahoo’s SMTP server:

S: 220 smtp.mail.yahoo.com ESMTP ready
C: EHLO [192.168.0.11]
S: 250-smtp.mail.yahoo.com
S: 250-PIPELINING
S: 250-SIZE 41697280
S: 250-8 BITMIME
S: 250 STARTTLS

Can you spot the problem? It’s not that easy, and it has been brought to my attention by one of our customers:

S: 220 smtp.mail.yahoo.com ESMTP ready
C: EHLO [192.168.0.11]
S: 250-smtp.mail.yahoo.com
S: 250-PIPELINING
S: 250-SIZE 41697280
S: 250-8 BITMIME
S: 250 STARTTLS

It supposed to be: 8BITMIME, at least according to RFC6152

the EHLO keyword value associated with the extension is 8BITMIME;

Most annoying part is that in many cases, space is used to split extensions keyword and its parameters e.g. SIZE 41697280. We want Mail.dll to be robust enough to accept custom extensions or extensions unknown yet, that follow this standard.

Shame on you Yahoo!.

livemail.co.uk SMTP bug

$
0
0

Recently one of our clients reported an issue with the SMTP server they use. The problem occurred only in Mail.dll. Outlook was working correctly.

The exception we are getting is:

Limilabs.Client.ServerException: 5.5.1 Invalid command
at Limilabs.Client.SMTP.Smtp.[1](String [1], Boolean
)
at Limilabs.Client.SMTP.Smtp.LoginDIGEST(String user, String password)
at Limilabs.Client.SMTP.Smtp.UseBestLogin(String user, String password)
at ..Forms.ComposeEmailForm.SendEmail()

The SMPT settings are as follows:

Outgoing mail server: smtp.livemail.co.uk
Port: 587
Use SSL: false

After some investigation it turned out that livemail.co.uk incorrectly advertises CRAM-MD5 login method:

The server EHLO response is misleading:


S: 250-AUTH LOGIN PLAIN CRAM-MD5 DIGEST-MD5
S: 250-ENHANCEDSTATUSCODES
S: 250-8BITMIME
S: 250-DSN
S: 250 AUTH PLAIN LOGIN CRAM-MD5

Notice that it sends DIGEST-MD5 in first AUTH response and it doesn’t send it in the second one. Unfortunately Mail.dll uses the first response and it causes it to use CRAM:

C: AUTH DIGEST-MD5

the command fails, because it’s most likely not implemented by the server or not turned on:

S: 500 5.5.1 Invalid command

AUTH PLAIN and AUTH LOGIN methods do work without any problems

using (Smtp client = new Smtp())
{
    client.Connect("smtp.livemail.co.uk");
    client.Login("user", "pass");
    //...
    client.Close();
}
using (Smtp client = new Smtp())
{
    client.Connect("smtp.livemail.co.uk");
    client.LoginPLAIN("user", "pass");
    //...
    client.Close();
}

Enable POP3 in Gmail

$
0
0
  1. Sign in to Gmail.
  2. Click the gear icon in the upper-right and select Mail settings .
  3. Click Forwarding and POP/IMAP.
  4. Select Enable POP for all mail or Enable POP for mail that arrives from now on. Here you can learn more about Gmail’s POP3 behavior
  5. Remember that Gmail only allows secure SSL connections so you need to use ConnectSSL method.

Perfectly secure ‘less’ secure apps

For some (newer) Google accounts you may need to enable access for ‘less’ secure apps.

Please note that contrary to what the label says those applications (such as Thunderbird or Outlook) are secure – they use TLS or SSL to secure the communication.

The term ‘less secure apps’ is used only because such applications need to store the primary account password to be able to access POP3.

‘Less’ secure apps alternatives

  1. IMAP and OAuth 2.0 (OAuth 2.0 for installed applications, OAuth 2.0 for web applications, OAuth 2.0 for service accounts) which works despite the disabled ‘less secure apps’ setting.
  2. Application specific passwords (Create application specific password)

2-step verification

If you use 2-Step-Verification and are seeing a “password incorrect” error when trying to access POP3, an app password may solve the problem. An application specific password is a 16-digit password that gives an application permission to access your Google Account.

Create application specific password.

Simple .NET POP3 access sample

// C# code:

using(Pop3 pop3 = new Pop3())
{
	pop3.ConnectSSL("pop.gmail.com");
	pop3.Login("your_email@gmail.com", "password");

	foreach (string uid in pop3.GetAll())
	{
		var eml = pop3.GetMessageByUID(uid);
		IMail mail= new MailBuilder()
			.CreateFromEml(eml);

		Console.WriteLine(mail.Subject);
		Console.WriteLine(mail.Text);
	}
	pop3.Close();
}

' VB.NET code:

Using pop3 As New Pop3()
    pop3.ConnectSSL("pop.gmail.com")
    pop3.Login("your_email@gmail.com", "password")

    For Each uid As String In pop3.GetAll()
        Dim email As IMail = New MailBuilder() _
            .CreateFromEml(pop3.GetMessageByUID(uid))
        Console.WriteLine(email.Subject)
	Console.WriteLine(mail.Text)
    Next
    pop3.Close()
End Using

More .NET POP3 samples. You can download Mail.dll POP3 library for .NET here.


Enable IMAP in Gmail

$
0
0
  1. Sign in to Gmail.
  2. Click the gear icon in the upper-right and select Settings.
  3. Click Forwarding and POP/IMAP.
  4. Select Enable IMAP.
  5. Remember that Gmail only allows secure SSL connections so you need to use ConnectSSL method.

Perfectly secure ‘less’ secure apps

For some (newer) Google accounts you may need to enable access for ‘less’ secure apps (for Google Apps this setting is not available – it’s enabled by default).

Please note that contrary to what the label says those applications (such as Thunderbird or Outlook) are secure – they use TLS or SSL to secure the communication.

The term ‘less secure apps’ is used only because such applications need to store the primary account password to be able to access IMAP.

‘Less’ secure apps alternatives

  1. OAuth 2.0 (OAuth 2.0 for installed applications, OAuth 2.0 for web applications, OAuth 2.0 for service accounts) which works despite the disabled ‘less secure apps’ setting.
  2. Application specific passwords (Create application specific password)

2-step verification

If you use 2-Step-Verification and are seeing a “password incorrect” error when trying to access IMAP, an app password may solve the problem. An application specific password is a 16-digit password that gives an application permission to access your Google Account.

Create application specific password.

Simple .NET IMAP access sample

// C# code:

using(Imap imap = new Imap())
{
	imap.ConnectSSL("imap.gmail.com");
	imap.UseBestLogin("pat@gmail.com", "password");

	imap.SelectInbox();

	List<long> uids = imap.Search(Flag.Unseen);
	foreach (long uid in uids)
	{
		var eml = imap.GetMessageByUID(uid);
		IMail mail = new MailBuilder().CreateFromEml(eml);

		Console.WriteLine(mail.Subject);
		Console.WriteLine(mail.Text);
	}
	imap.Close();
}
' VB.NET code:

Using imap As New Imap()
	imap.ConnectSSL("imap.gmail.com")
	imap.UseBestLogin("pat@gmail.com", "password")

	imap.SelectInbox()

	Dim uids As List(Of Long) = imap.Search(Flag.Unseen)
	For Each uid As Long In uids
		Dim eml = imap.GetMessageByUID(uid)
		Dim mail As IMail = New MailBuilder().CreateFromEml(eml)

		Console.WriteLine(mail.Subject)
		Console.WriteLine(mail.Text)
	Next
	imap.Close()
End Using

More .NET IMAP samples. You can download Mail.dll IMAP library for .NET here.

Delete email permanently in Gmail

$
0
0

If you delete a message from your Inbox or one of your custom folders, it will still appear in [Gmail]/All Mail.

Here’s why: in most folders, deleting a message simply removes that folder’s label from the message, including the label identifying the message as being in your Inbox.

[Gmail]/All Mail shows all of your messages, whether or not they have labels attached to them.

If you want to permanently delete a message from all folders:

  1. Move it to the [Gmail]/Trash folder (or [Gmail]/Bin or national version).
  2. Delete it from the [Gmail]/Trash folder (or [Gmail]/Bin or national version).

All emails in [Gmail]/Spam and [Gmail]/Trash are deleted after 30 days.
If you delete a message from [Gmail]/Spam or [Gmail]/Trash, it will be deleted permanently.

Here’s how this looks like using Mail.dll .NET IMAP component:

// C# version:

using(Imap imap = new Imap())
{
	imap.ConnectSSL("imap.gmail.com");
	imap.UseBestLogin("user@gmail.com", "password");

	// Recognize Trash folder
	List<FolderInfo> folders = imap.GetFolders();
 	CommonFolders common = new CommonFolders(folders);
 	FolderInfo trash = common.Trash;

	// Find all emails we want to delete
	imap.SelectInbox();
	List<long> uids = imap.Search(Expression.Subject("email to delete"));

	// Move email to Trash
	List<long> uidsInTrash = new List<long>();
	foreach (long uid in uids)
	{
		long uidInTrash = (long)imap.MoveByUID(uid, trash);
		uidsInTrash.Add(uidInTrash);
	}

	// Delete moved emails from Trash
	imap.Select(trash);
	foreach (long uid in uidsInTrash)
	{
		imap.DeleteMessageByUID(uid);
	}

	imap.Close();
}
' VB.NET version:

Using imap As New Imap()
	imap.ConnectSSL("imap.gmail.com")
	imap.UseBestLogin("user@gmail.com", "password")

	' Recognize Trash folder
	Dim folders As List(Or FolderInfo) = imap.GetFolders()
	Dim common As CommonFolders = new CommonFolders(folders)
	Dim trash As FolderInfo = common.Trash

	' Find all emails we want to delete
	imap.SelectInbox()
	Dim uids As List(Of Long) = imap.Search(_
		Expression.Subject("email to delete"))

	' Move email to Trash
	Dim uidsInTrash As New List(Of Long)
	For Each uid As Long In uids
		Dim uidInTrash As Long = imap.MoveByUID(uid, trash)
		uidsInTrash.Add(uidInTrash)
	Next

	' Delete moved emails from Trash
	imap.[Select](trash)
	For Each uid As Long In uidsInTrash
		imap.DeleteMessageByUID(uid)
	Next

	imap.Close()
End Using

You can also use bulk methods to handle large amount of emails faster:

// C# version:

using(Imap imap = new Imap())
{
	imap.ConnectSSL("imap.gmail.com");
	imap.UseBestLogin("user@gmail.com", "password");

	// Recognize Trash folder
	List<FolderInfo> folders = imap.GetFolders();
 	CommonFolders common = new CommonFolders(folders);
 	FolderInfo trash = common.Trash;

	// Find all emails we want to delete
	imap.SelectInbox();
	List<long> uids = imap.Search(Expression.Subject("email to delete"));

	// Move emails to Trash
	List<long> uidsInTrash = imap.MoveByUID(uids, trash);

	// Delete moved emails from Trash
	imap.Select(trash);
	imap.DeleteMessageByUID(uidsInTrash);

	imap.Close();
}
' VB.NET version:

Using imap As New Imap()
	imap.ConnectSSL("imap.gmail.com")
	imap.UseBestLogin("user@gmail.com", "password")

	' Recognize Trash folder
	Dim folders As List(Or FolderInfo) = imap.GetFolders()
	Dim common As CommonFolders = new CommonFolders(folders)
	Dim trash As FolderInfo = common.Trash

	' Find all emails we want to delete
	imap.SelectInbox()
	Dim uids As List(Of Long) = imap.Search(Expression.Subject("email to delete"))

	' Move email to Trash
	Dim uidsInTrash As List(Of Long) = imap.MoveByUID(uids, trash)

	' Delete moved emails from Trash
	imap.[Select](trash)
	imap.DeleteMessageByUID(uidsInTrash)

	imap.Close()
End Using

Please also note that there are 2 additional sections in the “Gmail settings”/”Forwarding and POP/IMAP” tab:

“When I mark a message in IMAP as deleted:”

  • Auto-Expunge on – Immediately update the server. (default)
  • Expunge off – Wait for the client to update the server.

“When a message is marked as deleted and expunged from the last visible IMAP folder:”

  • Archive the message (default)
  • Move the message to the Trash
  • Immediately delete the message forever

Those settings change the default behavior of the account and modify DeleteMessage* methods behavior.

Logging in Mail.dll

$
0
0

To enable logging for Mail.dll clients (Imap, Pop3, Smtp) you only need to add the following line before you connect:

// C# version:

Limilabs.Mail.Log.Enabled = true;

' VB.NET version:

Limilabs.Mail.Log.Enabled = True

You can observe the log output by:

  • looking at the Visual Studio’s output window (View/Output/’Show output from': Debug)
  • subscribing to Log.WriteLine event
  • defining custom listeners using your application’s config file (App.config or Web.config)
  • using log4net

This is how the log looks like in the Visual Studio’s output window:

You can also enable logging using your application’s config file (App.config, Web.config):

<?xml version="1.0" encoding="utf-8" ?>
<configuration>
    <system.diagnostics>

      <switches>
        <add name="Mail.dll" value="Verbose" />
      </switches>

    </system.diagnostics>
</configuration>

log4net

If you are using the latest version of log4net.dll, Mail.dll is going to use log4net instead of standard .NET System.Net.TraceSource class. Please refer to log4net manual on how to capture log entries.

Mail.dll uses logger called “Mail.dll” (_logger = LogManager.GetLogger(“Mail.dll”)) and level Info (_logger.Info(message)) to log information.

Please remember that even when using log4net, you need to enable logging by setting “Limilabs.Mail.Log.Enabled = True” or by setting Mail.dll trace switch in the config file (App.config, Web.config) to Verbose as shown above.

Log to file

You’ll need to define a TextWriterTraceListener that writes to a file and connect it with Mail.dll trace source. The easiest solution is to modify your application’s config file (App.config, Web.config) accordingly:

<?xml version="1.0" encoding="utf-8" ?>
<configuration>
    <system.diagnostics>

        <trace autoflush="true"/>
   
        <switches>
            <add name="Mail.dll" value="Verbose"/>
        </switches>
   
        <sources>
            <source name="Mail.dll">
                <listeners>
                    <add name="MailLogFile"/>
                </listeners>
            </source>
        </sources>
   
        <sharedListeners>
            <add 
                name="MailLogFile" 
                type="System.Diagnostics.TextWriterTraceListener" 
                initializeData="c:\mail.log"/>
        </sharedListeners>

    </system.diagnostics>
</configuration>

Log.WriteLine

Log class exposes WriteLine event. You can use that event to subscribe your own logging library.

// C#

Log.WriteLine += Console.WriteLine;
' VB.NET

Log.WriteLine += Console.WriteLine

Helpful POP3 and IMAP Exchange 2010 links

Helpful POP3 and IMAP Exchange 2013 links

NavigateToTest VS2015 extension

$
0
0
Extension is available for other Visual Studio versions:

You can download the extension here:
NavigateToTest Visual Studio 2015 extension

Here’s the latest version that supports Visual Studio 2015.

Extension is convention based. It matches ClassName file with ClassNameTest or ClassNameTests and vice-versa, so you can easily navigate to the test file and back.

Here are some screenshots:

Here’s the toolbar and two opened files:

You can download the extension here:
NavigateToTest Visual Studio 2015 extension

Using FTP TLS 1.2 with FTP

$
0
0

By default most systems allow SSL 3.0, TLS 1.0, 1.2 and 1.2 to be used.

TLS 1.2 is the most secure version of SSL/TLS protocols. It is easy to force the connection to use it. All you need to do is to set Ftp.SSLConfiguration.EnabledSslProtocols property to SslProtocols.Tls12:

// C#

using (Ftp ftp = new Ftp())
{
    ftp.SSLConfiguration.EnabledSslProtocols = SslProtocols.Tls12;

    ftp.ConnectSSL("ftps.example.com");

    ftp.Login("user","password");

    ftp.ChangeFolder("uploads");
    ftp.Upload("report.txt", @"c:\report.txt");


    ftp.Close();
}
' VB.NET

Using ftp As New Ftp()
	ftp.SSLConfiguration.EnabledSslProtocols = SslProtocols.Tls12

	ftp.ConnectSSL("ftps.example.com")

	ftp.Login("user", "password")

	ftp.ChangeFolder("uploads")
	ftp.Upload("report.txt", "c:\report.txt")


	ftp.Close()
End Using

For explicit SSL/TLS, code is almost the same. You first connect to non-secure port (21) and secure the connection using Ftp.AuthTLS command:

// C#

using (Ftp ftp = new Ftp())
{
    ftp.SSLConfiguration.EnabledSslProtocols = SslProtocols.Tls12;

    ftp.Connect("ftp.example.com");
    ftp.AuthTLS();

    ftp.Login("user","password");

    ftp.ChangeFolder("uploads");
    ftp.Upload("report.txt", @"c:\report.txt");

    ftp.Close();
}
' VB.NET

Using ftp As New Ftp()
	ftp.SSLConfiguration.EnabledSslProtocols = SslProtocols.Tls12

	ftp.Connect("ftp.example.com")
	ftp.AuthTLS()

	ftp.Login("user", "password")

	ftp.ChangeFolder("uploads")
	ftp.Upload("report.txt", "c:\report.txt")

	ftp.Close()
End Using

To use TLS 1.2 .NET Framework 4.5+ must be installed on your machine and you application should target .NET 4.5+.

It is possible to use TLS 1.2 in applications targeting .NET <4.5, but 4.5 must be installed on the machine. After you have .NET 4.5 installed, your 2.0-4.0 apps will use the 4.5 System.dll and you can enable TLS 1.2 using this code: [csharp] ftp.SSLConfiguration.EnabledSslProtocols = (SecurityProtocolType)3072; [/csharp]


Using TLS 1.2 with IMAP

$
0
0

By default most systems allow SSL 3.0, TLS 1.0, 1.2 and 1.2 to be used.

TLS 1.2 is the most secure version of SSL/TLS protocols. It is easy to force the connection to use it. All you need to do is to set Ftp.SSLConfiguration.EnabledSslProtocols property to SslProtocols.Tls12:

// C#

using (Imap imap = new Imap())
{
    imap.SSLConfiguration.EnabledSslProtocols = SslProtocols.Tls12;

    imap.ConnectSSL("imap.example.com");

    imap.UseBestLogin("user","password");

    // ...

    imap.Close();
}
' VB.NET

Using imap As New Imap()
	imap.SSLConfiguration.EnabledSslProtocols = SslProtocols.Tls12

	imap.ConnectSSL("imap.example.com")

	imap.UseBestLogin("user@example.com", "password")

	'...

	imap.Close()
End Using

For explicit SSL/TLS, code is almost the same. You first connect to non-secure port and secure the connection using Imap.StartTLS command:

// C#

using (Imap imap= new Imap())
{
    imap.SSLConfiguration.EnabledSslProtocols = SslProtocols.Tls12;

    imap.Connect("imap.example.com");
    imap.StartTLS();

    imap.UseBestLogin("user@example.com","password");

    // ...

    imap.Close();
}
' VB.NET

Using imap As New Imap()
	imap.SSLConfiguration.EnabledSslProtocols = SslProtocols.Tls12

	imap.Connect("imap.example.com")
	imap.StartTLS()

	imap.UseBestLogin("user@example.com", "password")

	'...

	imap.Close()
End Using

To use TLS 1.2 .NET Framework 4.5+ must be installed on your machine and you application should target .NET 4.5+.

It is possible to use TLS 1.2 in applications targeting .NET <4.5, but 4.5 must be installed on the machine. After you have .NET 4.5 installed, your 2.0-4.0 apps will use the 4.5 System.dll and you can enable TLS 1.2 using this code: [csharp] imap.SSLConfiguration.EnabledSslProtocols = (SecurityProtocolType)3072; [/csharp]

System.Security.Authentication.AuthenticationException

$
0
0

The token supplied to the function is invalid

Full exception looks like this:

System.Security.Authentication.AuthenticationException : A call to SSPI failed, see inner exception.
----> System.ComponentModel.Win32Exception : The token supplied to the function is invalid

Most likely your client tries to use TLS 1.2 but you are using old certificate on the server (e.g. signed using md5RSA algorithm).

There are 2 options for you:

  1. Regenerate the certificate (especially if it’s self-signed).
  2. Use older TLS version (TLS 1.1). You can force Mail.dll or Ftp.dll to use TLS 1.1 using the following code:
    using (XXX client = new XXX())
    {
        client.SSLConfiguration.EnabledSslProtocols = SslProtocols.Tls11;
    
        client.ConnectSSL("host");
    
        client.Close();
    }


    Please contact your server administrator as TLS 1.1 and SSL 3.0 aren’t considered secure anymore.

The client and server cannot communicate, because they do not possess a common algorithm

Full exception looks like this:

System.Security.Authentication.AuthenticationException : A call to SSPI failed, see inner exception.
----> System.ComponentModel.Win32Exception : The client and server cannot communicate, because they do not possess a common algorithm

There are 2 possible scenarios:

  1. In most cases this means that the client is trying to use older SSL protocols like SSL 3.0, TLS 1.0 or TLS 1.1, but the remote server requires modern protocol – TLS 1.2.

    By default all our clients support TLS 1.2. Some older versions need to be told to use TLS 1.2, it is also a good practice to force TLS 1.2 only:

    using (XXX client = new XXX())
    {
        client.SSLConfiguration.EnabledSslProtocols = SslProtocols.Tls12;
    
        client.ConnectSSL("host");
    
        client.Close();
    }
    
  2. Second option is the server is not supporting TLS 1.2 – you’ll need to use TLS 1.1:
    using (XXX client = new XXX())
    {
        client.SSLConfiguration.EnabledSslProtocols = SslProtocols.Tls11;
        // client.SSLConfiguration.EnabledSslProtocols = SslProtocols.Ssl3;
    
        client.ConnectSSL("host");
    
        client.Close();
    }
    
  3. Please contact your server administrator as TLS 1.1 and SSL 3.0 aren’t considered secure anymore.

Create code signing certificate

$
0
0

Management summary

  1. You generate certificate signing request on your machine (using certmgr or ActiveX component).
  2. Private/public key pair is generated along with the request (on your machine).
  3. You export certificate that represents the request from your certificate key store.
  4. You extract private key from the certificate that represents the request.
  5. You send the request (it contains public key only) to CA (or ActiveX does this automatically).
  6. CA sends your certificate back (crt file that is basically your public key, signed with CA’s keys).
  7. Finally you need to combine the private key and the crt to create a pfx, that contains both private key and the certificate.

Important points

  • Private key is generated along with the certificate request.
  • Private key is generated on your machine.
  • Private key is never sent to CA (Certificate Authority).
  • Certificate received from the CA (*.crt file) doesn’t contain your private key.
    • Generate CSR & private key – ActiveX

      Some vendors, like Comodo, use Active X component, that runs on your machine and creates certificate request along with private/public key pair generation on your machine:

      activex_01

      Private key can be found in the certmgr of the local account (not machine’s):

      activex_02

      Later on it must be exported as a pfx (e.g. “Request.pfx”).

      Generate CSR & private key – CertMgr

      In MMC (certmgr), expand Certificates (Local Computer) and then Personal.
      Right-click Certificates, and then go to the following menus: All Tasks > Advanced Operations > Create Custom Request:

      certmgr_00

      Click Next:

      certmgr_01

      Click Next:

      certmgr_02

      Click Next:

      certmgr_03

      Ensure the Request format is PKCS #10, and then click Next:

      certmgr_04

      Click the downward-facing arrow next to Details, and then click Properties.

      certmgr_06

      On the subject type, select the following values, enter the corresponding Value, and then click Add:

      • Common name – Your business or organization’s name
      • Organization – Your business or organization’s name
      • Locality – Your business or organization’s address
      • State – The state where your business or organization resides
      • Country – The country where your business or organization resides

      Go to the Private Key tab, click Key type, and then select Make private key exportable:
      Click OK, and then click Next:

      certmgr_07

      Browse for the location where you want to save the file, enter a File Name (“Request.csr”), and then click Finish.
      Your CSR is now stored in the file you saved it to on your local machine.

      certmgr_05

      Request file is regular text file:

      certmgr_15

      This process also creates a private key, which you will need to use later to create a PFX file to sign your code or driver.

      Export certificate that represents the request

      If you were using ActiveX to generate certificate request, certificate that represents the request (including private key) is stored in certmgr of the local account (not machine’s):

      activex_02

      Go to “Certificate Enrollment Requests”/ “Certificates” (Hit refresh if it is empty):

      certmgr_08

      Right-click the certificate and then go to the following menus: All Tasks > Export:

      certmgr_09

      Select export private key and hit Next:

      certmgr_10

      Ensure the Request format is PKCS #12, and then click Next:

      certmgr_11

      Specify password:

      certmgr_12

      Browse for the location where you want to save the file, enter a File Name (“Request.pfx”), and then click Finish.

      certmgr_13

      Click Finish:

      certmgr_14

      Certificate that represents your request is now stored in the file you saved on your local machine. It contains both private and public key.

      Extract private key

      First you’ll need to install OpenSSL.

      To extract private key from the request, issue following command:

      openssl pkcs12 -in Request.pfx -out Request_PrivateKey.pem -nocerts -nodes

      nocerts = private key only,
      nodes = no password

      Generate CSR & private key – OpenSSL

      You can use following command to create certificate request and key using OpenSSL:

      openssl req -new -newkey rsa:2048 -nodes -keyout Request_PrivateKey.key -out Request.csr

      You may need to convert to convert the key (BEGIN PRIVATE KEY) to PKCS#1 format (BEGIN RSA PRIVATE KEY):

      openssl rsa -outform pem -in Request_PrivateKey.key -out Request_PrivateKey.pem

      CA creates a certificate

      Now you should upload -or- copy&paste request file (“Request.csr”) to your CA, and in return, they should create the certificate for you:

      generated_00

      What you receive from your CA looks more or less like this:
      generated_01

      Most important file is the crt file which contains your certificate (it includes public key only).

      Combine private key with cert to create pfx

      To combine private key from the request and certificate from CA into one pfx certificate, issue following command:

      openssl pkcs12 -inkey Request_PrivateKey.pem -in 00…70.crt -export -out 00…70.pfx

      The pfx file you created contains both private key and the certificate and can be used to sign your code.

How to log System.Net

$
0
0

In your App.config add the following code:

<?xml version="1.0"?>
<configuration>
  <system.diagnostics>

    <trace autoflush="true"/>

    <switches>
      <add name="System.Net" value="Verbose" />
    </switches>

    <sources>

      <source name="System.Net">
        <listeners>
          <add name="SystemNetLogFile"/>
        </listeners>
      </source>

    </sources>

    <sharedListeners>
      <add name="SystemNetLogFile" type="System.Diagnostics.TextWriterTraceListener" initializeData="d:\system.net.log"/>
    </sharedListeners>

  </system.diagnostics>
</configuration>

That’s it!

The log looks like this:

System.Net Information: 0 : [8548] SecureChannel#238379
System.Net Information: 0 : [8548] Enumerating security
System.Net Information: 0 : [8548] Negotiate
System.Net Information: 0 : [8548] NegoExtender
System.Net Information: 0 : [8548] pku2u
System.Net Information: 0 : [8548] WDigest
System.Net Information: 0 : [8548] Kerberos
System.Net Information: 0 : [8548] NTLM
System.Net Information: 0 : [8548] Schannel
System.Net Information: 0 : [8548] Microsoft Unifie
System.Net Information: 0 : [8548] TSSSP
System.Net Information: 0 : [8548] CREDSSP
System.Net Information: 0 : [8548] SecureChannel#238379
System.Net Information: 0 : [8548] Current OS installat
System.Net Information: 0 : [8548] AcquireCredentialsHa
System.Net Error: 0 : [8548] AcquireCredentialsHandle()
System.Net Information: 0 : [8548] AcquireCredentialsHa
System.Net Error: 0 : [8548] AcquireCredentialsHandle()
System.Net Information: 0 : [8548] SecureChannel#214541
System.Net Information: 0 : [8548] AcquireCredentialsHa
System.Net Information: 0 : [8548] InitializeSecurityCo
System.Net Information: 0 : [8548] Remote certificate:
V3

[Subject]
CN=mail.postecert.it, O=Postecom S.p.A., L=Roma, S=Ro
Simple Name: mail.postecert.it
DNS Name: mail.postecert.it

[Issuer]
CN=GlobalSign Organization Validation CA - SHA256 - G
Simple Name: GlobalSign Organization Validation CA -
DNS Name: GlobalSign Organization Validation CA - SHA

[Serial Number]
0A9141CFE287B47FF4273C12

[Not Before]
2016-11-02 08:01:04

[Not After]
2017-11-03 08:01:04

[Thumbprint]
F12F74096659D9CCAA4ACD3432C896AF39CA8B9E

[Signature Algorithm]
sha256RSA(1.2.840.113549.1.1.11)

[Public Key]
Algorithm: RSA
Length: 2048
Key Blob: 30 82 01 0a 02 82 01 01 00 bf a1 62 b7 64 1
System.Net Information: 0 : [8548] SecureChannel#214541
System.Net Information: 0 : [8548] ProcessAuthenticatio

Order process maintenance scheduled for March 7, 2017

$
0
0

As part of our ongoing commitment to invest in and provide a scalable ecommerce platform that meets the advancing needs of our client base, we will be conducting planned maintenance to our system next week:

CET: Tuesday, March 7, 2017 from 2 p.m. to 6 p.m.
CST: Tuesday, March 7, 2017 from 7 a.m. to 11 a.m.
PST: Tuesday, March 7, 2017 from 5 a.m. to 9 a.m.
AEDT: Wednesday, March 8, 2017 from midnight to 4 a.m.

During the planned maintenance, the system will continue to take orders. However customers will see temporary delays in fulfillment and order confirmation emails.

Once the maintenance is finished, we expect all functionality to resume; orders will be processed and order confirmation emails will be sent to customers.

Viewing all 120 articles
Browse latest View live


<script src="https://jsc.adskeeper.com/r/s/rssing.com.1596347.js" async> </script>