You can also read how to use:
![Outlook]()
OAuth is an open protocol to allow secure API authorization in a simple and standard method from desktop and web applications.
This article describes using OAuth 2.0 to access Outlook.com IMAP and SMTP servers using .NET IMAP component in installed applications scenario. You can also use OAuth 2.0 with Outlook.com for web applications.
DotNetOpenAuth
First download the latest version of DotNetOpenAuth – it’s free, open source library that implements OAuth 2.0: http://www.dotnetopenauth.net
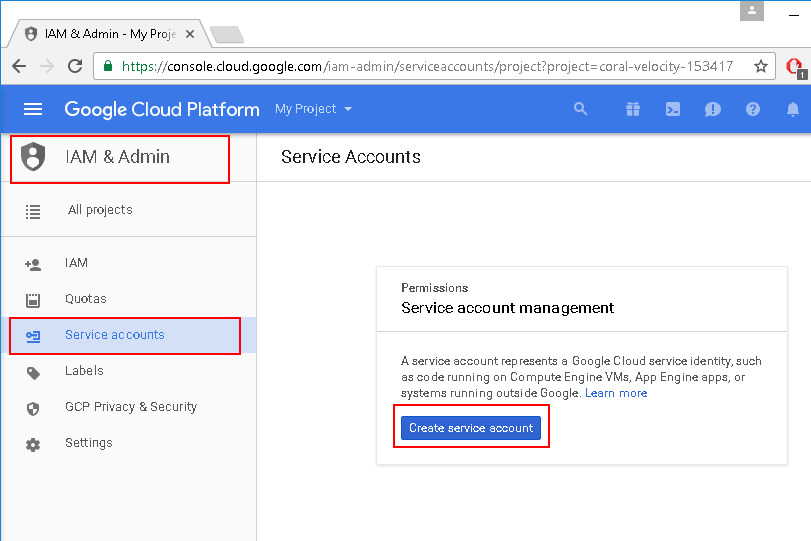
Register Application
Before you can use OAuth 2.0, you must register your application using the application management site. After you’ve registered, go to the My applications and create new application. On “API Settings” page, copy “Client ID” and “Client secret” values and specify “Redirect domain“, which you’ll need later.
![Outlook_AddAppKeys]()
Redirect domain must be valid domain address. For installed applications you can use domain address provided by Microsoft:
“https://login.live.com/oauth20_desktop.srf”
Now we can define clientID, clientSecret and scope variables, as well as Outlook.com OAuth 2.0 server addresses. Scope basically specifies what services we want to have access to. In our case it is user’s email address and IMAP/SMTP access:
string clientID = "000000014810009D";
string clientSecret = "wiRCccXnq1uyKcXnq1uyK";
AuthorizationServerDescription server = new AuthorizationServerDescription
{
AuthorizationEndpoint = new Uri("https://login.live.com/oauth20_authorize.srf"),
TokenEndpoint = new Uri("https://login.live.com/oauth20_token.srf"),
ProtocolVersion = ProtocolVersion.V20,
};
List<string> scope = new List<string> { OutlookScope.ImapAndSmtp.Name, OutlookScope.EmailAddress.Name };
Obtain an OAuth 2.0 access token
As we are using installed applications scenario we’ll use NativeApplicationClient class.
Because of a small issue in DotNetOpenAuth we can not use UserAgentClient directly. NativeApplicationClient inherits UserAgentClient and workarounds this issue. You can find the implementation of NativeApplicationClient on the bottom of this article.
NativeApplicationClient consumer = new NativeApplicationClient(server, clientID, clientSecret);
Uri userAuthorizationUri = consumer.RequestUserAuthorization(scope);
Process.Start(userAuthorizationUri.AbsoluteUri);
We are using Process.Start here, but you can also embed WebBrowser control in your application.
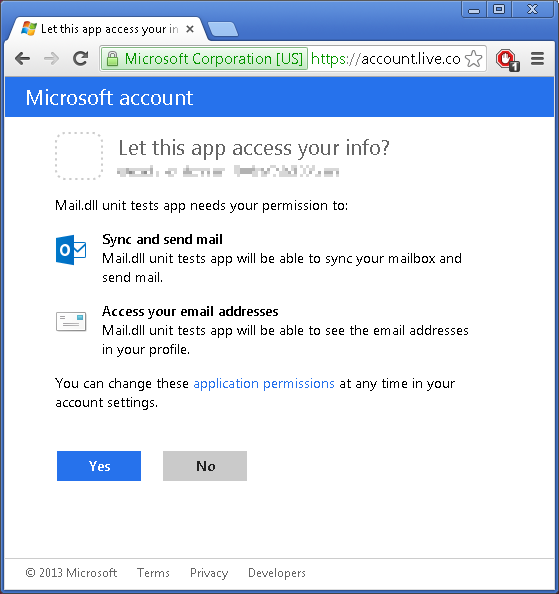
At this point user is redirected to Microsoft to authorize the access:
![Outlook_2Confirm]()
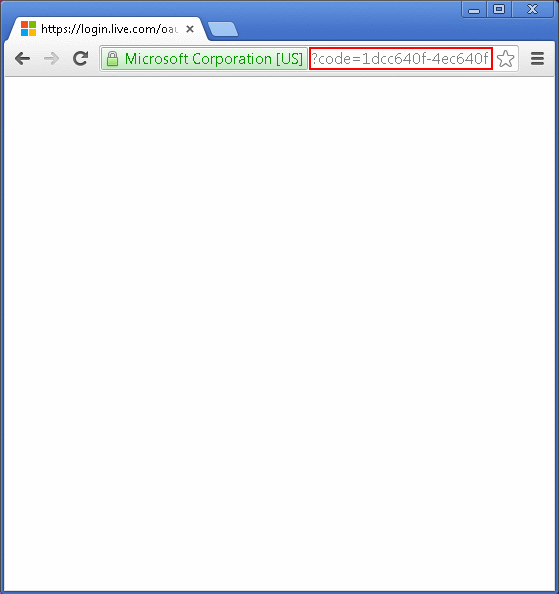
After this step user is presented a code that needs to be pasted to your application:
![Outlook_3Redirect]()
Please note that this code also appears in the title of the browser:
- It is possible to monitor processes on your machine and act automatically when it is there.
- If you use embedded WebBrowser control in your application, you can monitor the HTML document title after any redirect.
Following is a code that reads this code and contacts Outlook.com to exchange it for a refresh-token and an access-token:
string authCode = Console.ReadLine();
consumer.ClientCredentialApplicator =
ClientCredentialApplicator.PostParameter(clientSecret);
IAuthorizationState grantedAccess = consumer.ProcessUserAuthorization(authCode);
string accessToken = grantedAccess.AccessToken;
An access token is usually short lived, and allows you to access the user’s data. You may also received a refresh token. A refresh token can be used to request a new access token once the previous expired.
Access IMAP/SMTP server
Finally we’ll ask Microsoft for user’s email and use LoginOAUTH2 method to access Outlook.com IMAP server:
IAuthorizationState grantedAccess = consumer.ProcessUserAuthorization(authCode);
string accessToken = grantedAccess.AccessToken;
OutlookApi api = new OutlookApi(accessToken);
string user = api.GetEmail();
using (Imap client = new Imap())
{
client.ConnectSSL("imap-mail.outlook.com");
imap.LoginOAUTH2(user, accessToken);
imap.SelectInbox();
List<long> uids = imap.Search(Flag.Unseen);
foreach (long uid in uids)
{
string eml = imap.GetMessageByUID(uid);
IMail email = new MailBuilder().CreateFromEml(eml);
Console.WriteLine(email.Subject);
}
imap.Close();
}
NativeApplicationClient class
The OAuth 2.0 client for use by native applications. It’s main purpose is to build a generic URL containing the auth code, because DotNetOpenAuth library only allows parsing an URL as a method of retrieving the AuthorizationState.
/// <summary>
/// The OAuth2 client for use by native applications.
/// This is a partial implementation which should be used until
/// the feature has been fully implemented in DotNetOpenAuth.
/// </summary>
public class NativeApplicationClient : UserAgentClient
{
/// <summary>
/// Represents a callback URL which points to a special out of band page
/// used for native OAuth2 authorization. This URL will cause the authorization
/// code to appear in the title of the window.
/// </summary>
public string OutOfBandCallbackUrl = "https://login.live.com/oauth20_desktop.srf"; // Outlook
/// <summary>
/// Initializes a new instance of the <see cref="UserAgentClient"/> class.
/// </summary>
/// <param name="authorizationServer">The token issuer.</param>
/// <param name="clientIdentifier">The client identifier.</param>
/// <param name="clientSecret">The client secret.</param>
public NativeApplicationClient(
AuthorizationServerDescription authorizationServer,
string clientIdentifier,
string clientSecret)
: base(authorizationServer, clientIdentifier, clientSecret)
{
}
/// <summary>
/// Initializes a new instance of the <see cref="UserAgentClient"/> class.
/// </summary>
/// <param name="authorizationServer">The token issuer.</param>
public NativeApplicationClient(
AuthorizationServerDescription authorizationServer)
: this(authorizationServer, null, null)
{
}
/// <summary>
/// Creates the URL which should be used by the user to request the initial
/// authorization. Uses the default Out-of-band-URI as a callback.
/// </summary>
/// <param name="scope">Set of requested scopes</param>
/// <returns>URI pointing to the authorization server</returns>
public Uri RequestUserAuthorization(IEnumerable<string> scope)
{
var state = new AuthorizationState(scope);
state.Callback = new Uri(OutOfBandCallbackUrl);
return RequestUserAuthorization(state, false, null);
}
/// <summary>
/// Uses the provided authorization code to create an authorization state.
/// </summary>
/// <param name="authCode">The authorization code for getting an access token.</param>
/// <param name="authorizationState">The authorization. Optional.</param>
/// <returns>The granted authorization, or <c>null</c> if the authorization was null or rejected.</returns>
public IAuthorizationState ProcessUserAuthorization(
string authCode,
IAuthorizationState authorizationState)
{
if (authorizationState == null)
{
authorizationState = new AuthorizationState(null);
authorizationState.Callback = new Uri(OutOfBandCallbackUrl);
}
// Build a generic URL containing the auth code.
// This is done here as we cannot modify the DotNetOpenAuth library
// and the underlying method only allows parsing an URL as a method
// of retrieving the AuthorizationState.
string url = "http://example.com/?code=" + authCode;
return ProcessUserAuthorization(new Uri(url), authorizationState);
}
/// <summary>
/// Uses the provided authorization code to create an authorization state.
/// </summary>
/// <param name="authCode">The authorization code for getting an access token.</param>
/// <returns>The granted authorization, or <c>null</c> if the authorization was null or rejected.</returns>
public IAuthorizationState ProcessUserAuthorization(string authCode)
{
return ProcessUserAuthorization(authCode, null);
}
};
Refreshing access token
An access token is usually short lived. The main reason behind this is security and prevention of replay attacks. This means that for long-lived applications you need to refresh the access token. To force sending refresh token you need to add “wl.offline_access” to requested scopes:
List<string> scope = new List<string> { OutlookScope.ImapAndSmtp.Name, OutlookScope.EmailAddress.Name, OutlookScope.OfflineAccess.Name };
Refreshing access token
We recommend storing entire IAuthorizationState object received from WebServerClient.ProcessUserAuthorization method call. This object contains both: refresh token and access token, along with its expiration time.
The process of refreshing access token is simple:
IAuthorizationState grantedAccess = ...
consumer.RefreshAuthorization(grantedAccess, TimeSpan.FromMinutes(20));
In the example above the access token will not be refreshed if its remaining lifetime exceeds 20 minutes.
Apps and services you’ve given access
Users can manage consent for applications and services that can access some of their data on consent panel


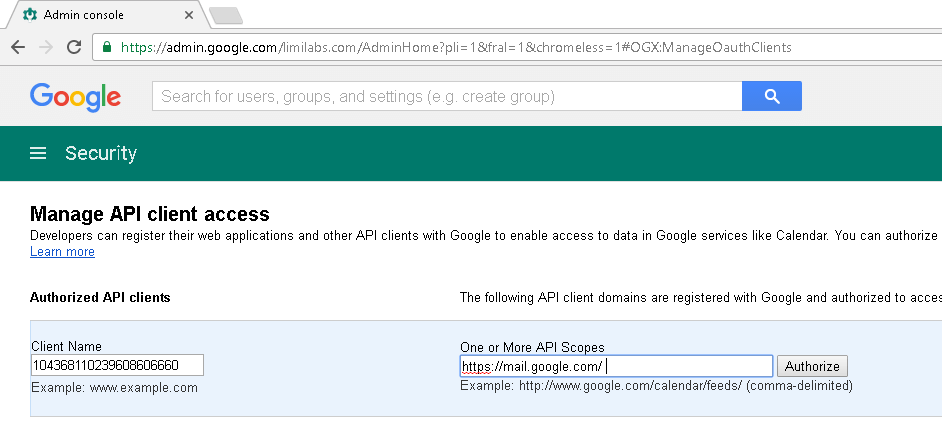
 In this article I’ll show how to access Gmail account of any domain user, using OAuth 2.0 and service accounts. The basic idea is that domain administrator can use this method to access user email without knowing user’s password.